Ever wonder why the price suddenly shoots up from certain levels? Or why does it drop hard when it hits specific zones? The answer lies in supply and demand. This is not just theory. It is how markets actually work.
Most traders chase indicators that lag behind. But supply and demand show you where the real action happens. It reveals where big players step in. Where institutions load up positions. Where smart money hides.
In this guide, you will learn how to spot these powerful zones. How to enter trades with confidence. And how to build a strategy that works across forex, stocks, crypto, and more.
Ready to read price like a professional? Let’s get started.
What is Supply and Demand Trading?
Think of a busy marketplace. When everyone wants to buy apples but few are selling, prices go up. When too many apples flood the market and buyers are scarce, prices drop. Trading works exactly the same way.
Supply and demand trading is built on a basic economic rule:
- Supply: When sellers overpower buyers, the price drops.
- Demand: When buyers overpower sellers, price rises.
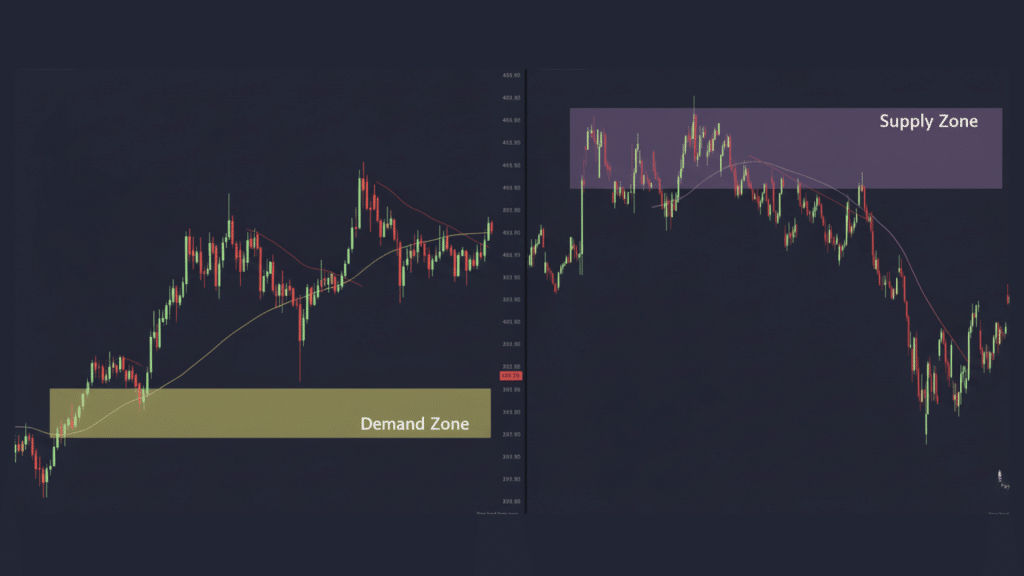
In the trading world, supply and demand zones mark specific areas on your chart. These are spots where buying or selling pressure created a big imbalance. Smart money and large institutions often return to these same zones. They leave footprints. And those footprints help us predict where the price might react again.
These zones are not random. They show where powerful moves began. When price comes back to test them, traders watch closely. Will the zone hold? Will buyers or sellers show up again?
Example: Imagine the price shoots up fast from a flat base. That base below becomes a demand zone. Later, if the price falls back to that same area, many traders expect it to bounce higher. Why? Because strong demand was there before. It might still be waiting.
Why Supply and Demand Matter in Trading?
Most indicators show you what has already happened. They follow price like a shadow follows you. But supply and demand analysis is different. It focuses on pure price action. It reveals where big moves started and where they could start again.
This method cuts through the noise. You see the market through the eyes of institutions, not lagging tools.
Benefits include:
- High-probability entries: You know exactly where to enter with confidence.
- Clear risk management: Stop-loss and take-profit levels become obvious and logical.
- Universal application: It works in Forex, stocks, crypto, commodities, and any liquid market.
- Institutional insight: You begin to understand how big players think and act.
Essential Supply and Demand Patterns

The market speaks in patterns. Once you learn its language, you can spot opportunities before most traders do. These four patterns repeat over and over across all timeframes and markets.
1. Rally–Base–Drop (RBD)
This pattern marks a supply zone. Price climbs fast, pauses briefly to form a base, then drops hard. The base becomes your supply zone. Sellers stepped in there with force. If prices return, they might sell again.
2. Drop–Base–Rally (DBR)
This is the opposite. It signals a demand zone. Price falls sharply, consolidates in a tight base, then rockets upward. Buyers entered aggressively at that base. When the price comes back, watch for another buying surge.
3. Rally–Base–Rally (RBR)
This shows continued strength. Price rallies, takes a breather in a base, then rallies again. The base acts as a demand zone within an uptrend. Buyers are still in control. They just paused to gather more fuel.
4. Drop–Base–Drop (DBD)
This confirms continued weakness. Price drops, pauses briefly, then drops further. The base becomes a supply zone during a downtrend. Sellers are dominating. The pause was just temporary before the next wave down.
Different Types of Supply and Demand Formations
Not all zones are created equal. Some are fresh and untouched. Others have been tested before. Some appear during trends, while others signal reversals. Understanding these differences helps you choose the best setups and avoid traps.
| Formation Type | Description | Trading Consideration |
|---|---|---|
| Fresh Zones | Not yet tested by price. | Often the strongest. Price has not returned since the zone formed. High probability of reaction. |
| Retested Zones | Already touched once before. | Still valid but weaker. The zone has been tested, so buyer or seller interest may be reduced. |
| Nested Zones | Smaller zones sit inside larger ones. | Shows multi-timeframe confluence. When both align, the setup becomes more reliable. |
| Continuation Zones | Form during strong trends as price pauses. | Institutions use these to add to positions. Price usually continues in the trend direction after retesting. |
| Reversal Zones | Appear near market tops or bottoms. | Signal potential turning points. These require extra confirmation before entering. |
| Trap or Fake Zones | Created by false breakouts or liquidity grabs. | Designed to trick retail traders. Price briefly enters the zone, triggers stops, then reverses sharply. |
Knowing which type of zone you are trading makes all the difference. Fresh zones at continuation points during trends often give the cleanest trades. Trap zones, on the other hand, can wipe out your account if you enter without confirmation.
How to Identify Supply and Demand Zones?
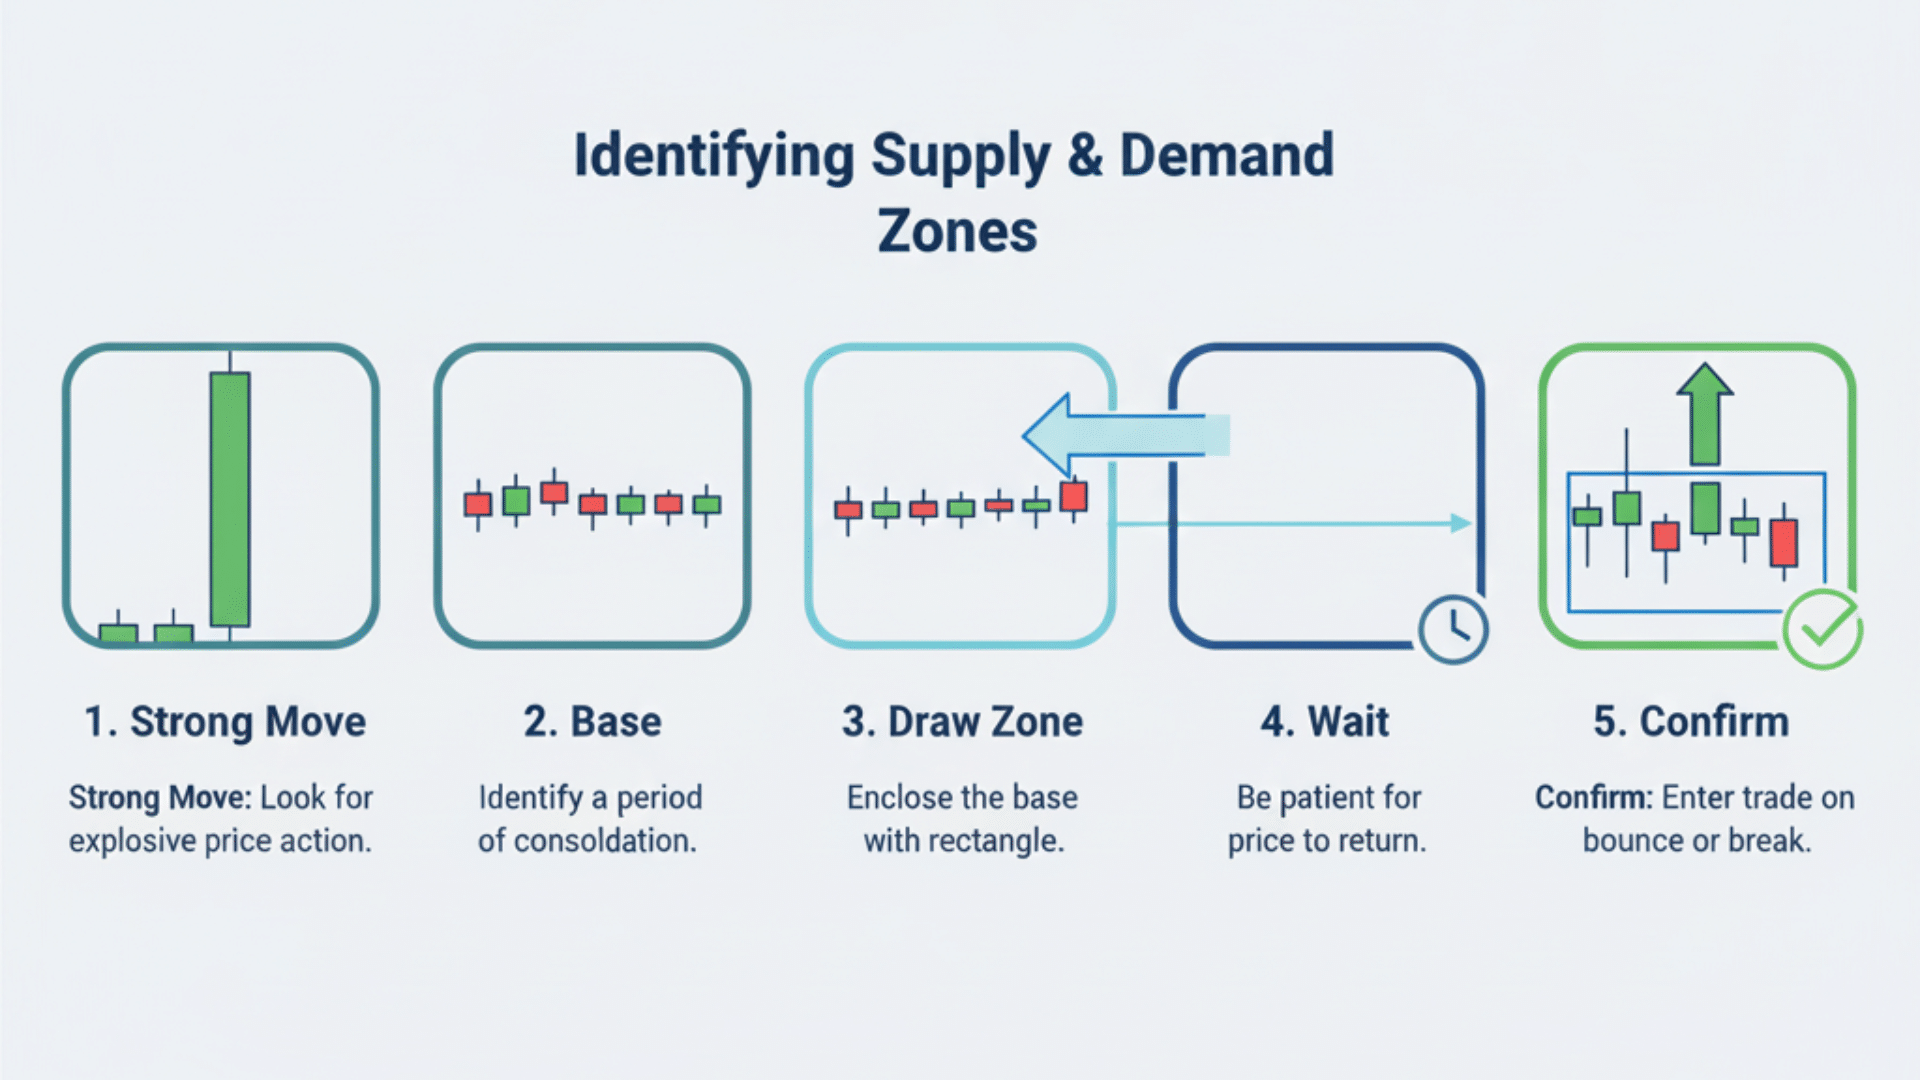
Finding zones is not guesswork. It is a skill you build with practice. Follow these five steps, and you will start seeing them everywhere on your charts.
Step 1: Look for a Strong Impulsive Move
Scan your chart for sharp rallies or drops. These moves should be quick and powerful. The stronger the move, the more reliable the zone. Weak or slow moves do not create quality zones.
Step 2: Identify the Base
Find the sideways candles right before the big move. This is your base. It is usually a small consolidation area. The tighter and shorter the base, the better. Long bases often produce weaker zones.
Step 3: Draw the Zone from the Edge of the Base to the Candle Wick
Mark the zone from the last candle before the move started. Extend it to include the wick or tail of that candle. This range is your zone. Do not make it too wide or too narrow.
Step 4: Wait for Price to Return to This Zone
Patience is key. Mark the zone and wait. Price may take days, weeks, or even months to come back. Do not force trades. Let the market come to you.
Step 5: Enter Only After Confirmation
Never enter blindly when the price touches the zone. Wait for proof. Look for rejection wicks, engulfing candles, or a spike in volume. Confirmation reduces false entries and protects your capital.
Pro Tip: Zones Are More Reliable When They:
- Strong initial move: The sharper the explosion away from the base, the stronger the zone.
- Short time in base: Less time spent consolidating means more urgency and power.
- Fresh and untested: Zones that have not been revisited yet hold the most potential.
Building a Supply and Demand Trading Strategy
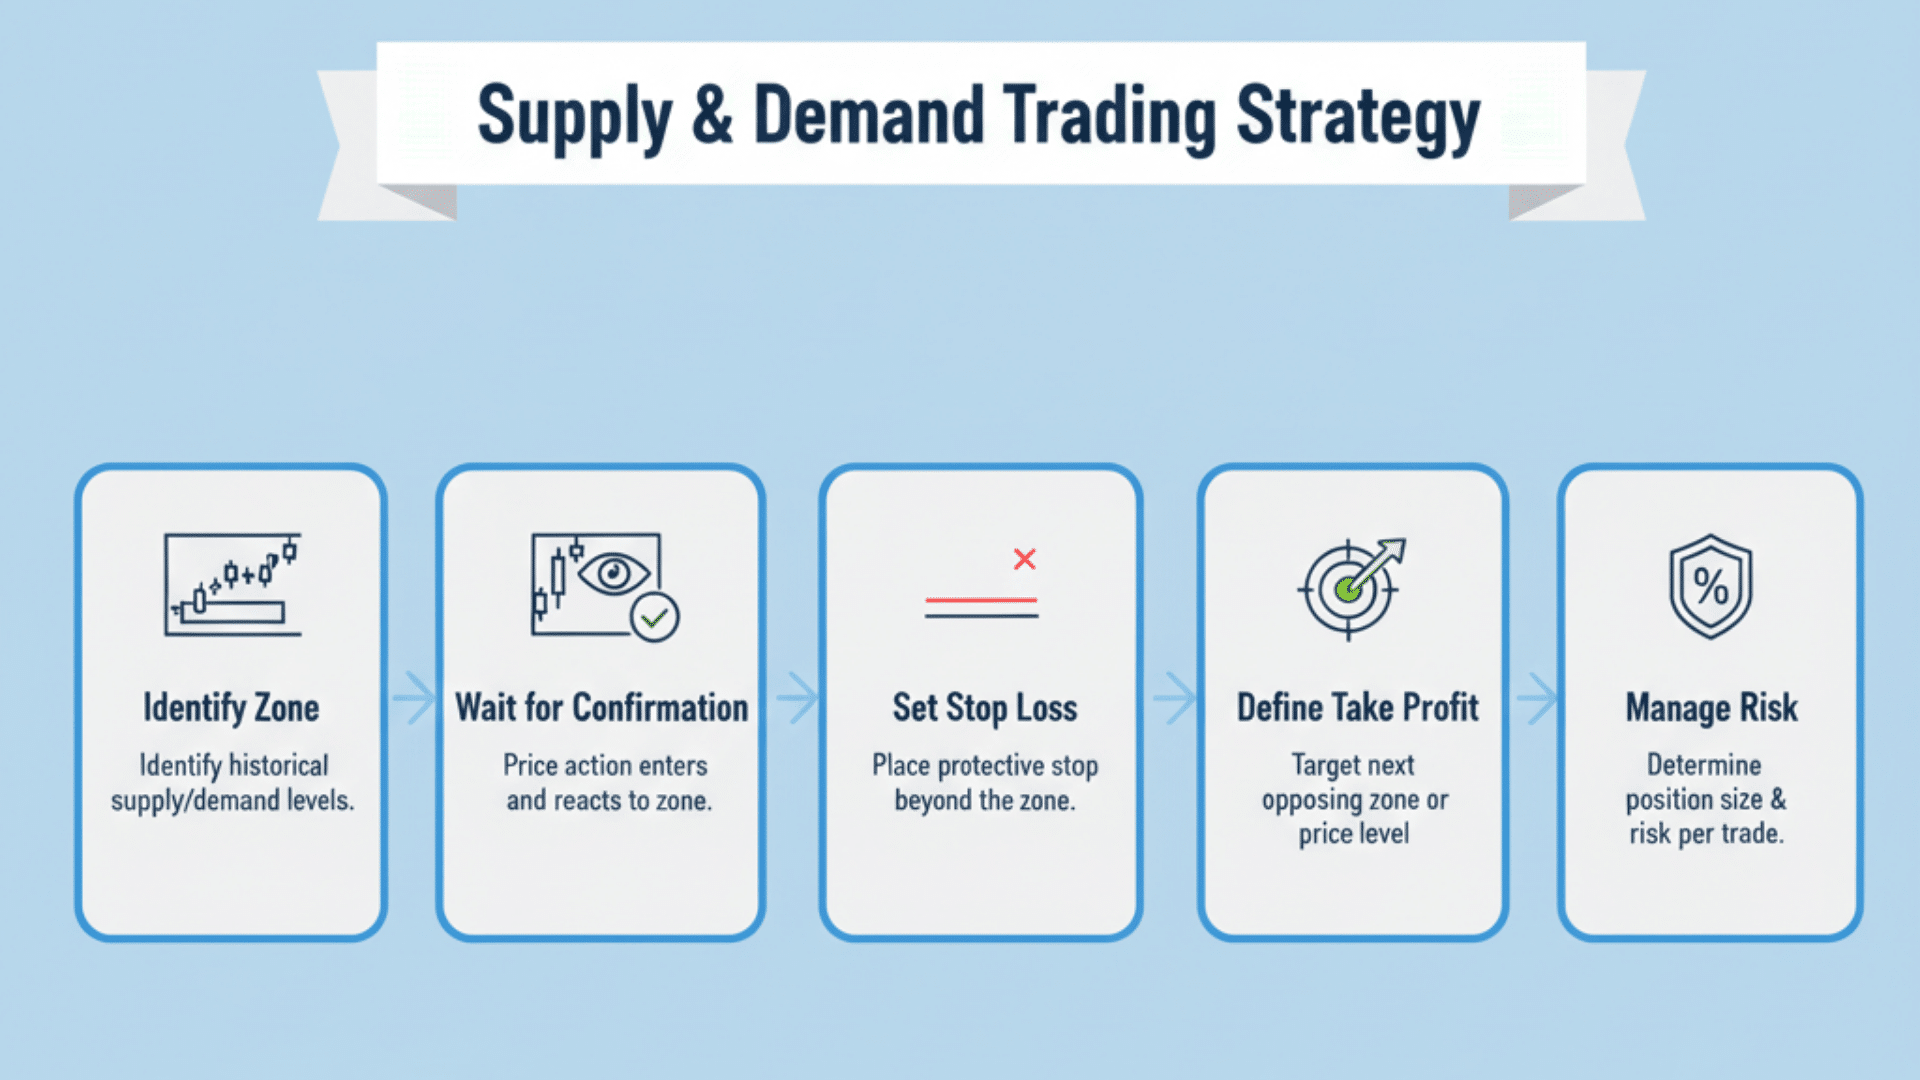
Spotting zones is only half the battle. Knowing when to enter, where to place your stop, and when to exit is what separates winners from losers. A solid strategy keeps you disciplined and protects your capital.
1. Entry Rules
Do not jump at the moment the price touches a zone. Wait for confirmation. Buy at a demand zone only after you see bullish signals like a strong rejection wick or engulfing candle. Sell at a supply zone only after bearish confirmation appears. Patience here saves you from countless false entries.
2. Stop Loss Placement
Your stop loss protects you when the zone fails. For buy trades, place your stop just below the lowest point of the demand zone. For sell trades, place it just above the highest point of the supply zone. This way, if the zone breaks, you exit quickly with minimal damage.
3. Take Profit Targets
Your first target should be the nearest opposing zone. If you buy at demand, aim for the next supply zone above. Your second target depends on your risk-reward ratio. Most traders aim for at least 1:2 or 1:3. This means if you risk $100, you target $200 or $300 in profit.
4. Risk Management
Never risk more than 1 to 2% of your account on a single trade. No matter how perfect the setup looks, stick to this rule. Use fixed position sizing. Always check your risk reward ratio before entering. If the trade does not offer at least 1:2, skip it and wait for a better setup.
Advanced Concepts in Supply and Demand Trading
Once the basics become second nature, it is time to level up. These advanced techniques help you filter out weak setups and focus only on high probability trades. They add layers of confirmation that professional traders use every day.
- Multi-Timeframe Analysis: Identify your zones on higher timeframes like the daily or four-hour chart, then zoom into lower timeframes for precise entries and better risk-reward ratios.
- Confluence Tools: Combine your supply and demand zones with trendlines, Fibonacci retracements, or volume spikes to create multiple reasons for price to react at the same spot.
- Institutional Order Flow: Learn to spot where big institutions leave their marks through sudden imbalances, large wicks, or aggressive moves that signal smart money activity.
Pros and Cons of Supply and Demand Trading
Like any trading method, supply and demand have its strengths and weaknesses. Understanding both sides helps you set realistic expectations and prepare for challenges along the way.
| Pros | Cons |
|---|---|
| Works on all timeframes and markets | Requires practice to draw zones correctly |
| Logical and data-driven | Prone to false breakouts in volatile markets |
| Provides precise entries and exits | Needs patience for the price to revisit zones |
Supply and demand trading is powerful, but it is not a magic formula. You need time to practice drawing zones accurately. Volatile markets can fake you out with false breakouts. And sometimes you wait days or weeks for the price to return to your zone. But if you are patient and disciplined, the rewards are worth it.
Tips for Improving Your Trading Strategy
Getting better at supply and demand trading is not about taking more trades. It is about taking smarter ones. These tips will sharpen your skills and keep you consistent over time.
- Focus on quality of zones, not quantity: Trade only the cleanest, freshest zones with strong moves and tight bases.
- Backtest every setup before risking real money: Go back in time on your charts and test your rules to see what works and what does not.
- Use alerts to monitor price approaching zones: Set notifications so you never miss a setup and can watch price action as it unfolds.
- Journal every trade and learn what works for you: Write down your entries, exits, emotions, and results to spot patterns in your own behavior.
- Stay patient, the best setups come to those who wait: Do not force trades just because you are bored or want action right now.
Trading Examples Using Supply and Demand
Theory is important. But seeing how supply and demand work in live markets makes everything click. These real-world examples show you what to look for and what to avoid.
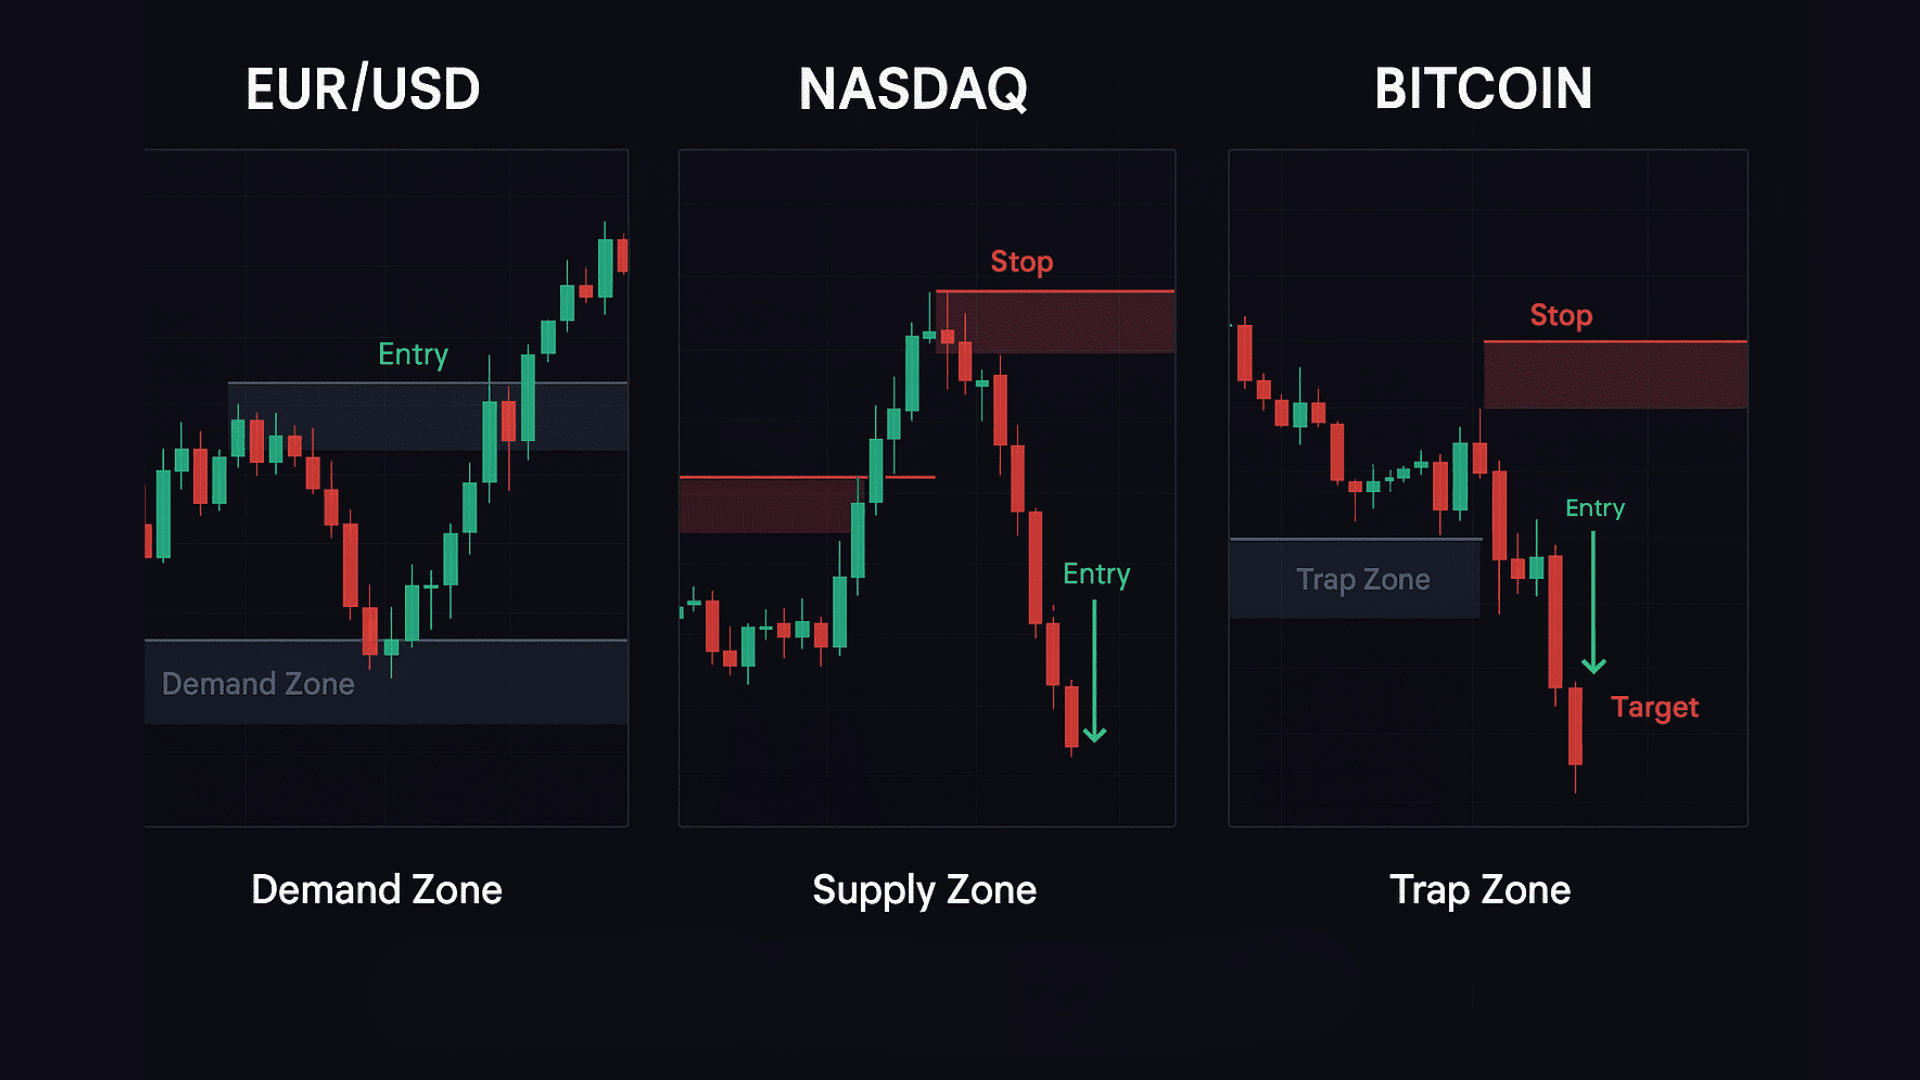
Example 1: Demand Zone in EUR/USD (Forex)
Price dropped sharply on EUR/USD from 1.1200 to 1.1050 in just a few hours. Before the drop, there was a tight base between 1.1045 and 1.1050. This became a strong demand zone.
Two days later, the rice fell back to 1.1048. A bullish engulfing candle formed right at the zone. Traders who entered long here with a stop below 1.1040 caught a 60 pip move back to 1.1110.
Lesson learned: Fresh demand zones in forex often react quickly when combined with bullish confirmation candles.
Example 2: Supply Zone in NASDAQ (Index)
NASDAQ rallied from 14,500 to 14,800 over three days. Just before the rally, the price consolidated in a narrow range between 14,480 and 14,500. That base became a supply zone.
A week later, price retraced back to 14,495. Sellers stepped in hard with a strong bearish rejection candle. The index dropped 200 points over the next two sessions.
Lesson learned: Supply zones near recent highs in indices can produce strong reversals, especially when combined with overbought conditions.
Example 3: False Zone Breakout Example
A trader marked a demand zone on Bitcoin at $28,200 after a sharp rally. Price returned and briefly dipped to $28,150, triggering many buy orders.
But instead of bouncing, the price sliced through the zone and dropped another $500. This was a trap zone. Institutions used it to grab liquidity before pushing the price lower.
Lesson learned: Always wait for confirmation. Not every zone holds. If the price breaks through aggressively without hesitation, exit quickly and do not fight the move.
Key Takeaways
Supply and demand trading is not just another method. It is a way to see the market through the eyes of institutions. You learn where big moves begin. Where they might begin again. And how to position yourself ahead of the crowd.
Start by mastering the basics. Practice drawing zones. Wait for confirmation. Manage your risk on every single trade. Keep a journal. Review your setups. Learn from your wins and your losses.
The market rewards patience and discipline. Not speed. Not luck.
Ready to put this into action? Open your charts right now. Find one clean demand or supply zone. Mark it. Set an alert. And wait for the price to come back. Your first high probability trade could be just around the corner.